
It’s time to take our Conditional Access management skills to the next level! A ring based deployment model makes it easy to test policy changes in a small scale at first, and then successively roll it out throughout the organisation. We can detect issues early on without affecting all users, and we can increase our deployment speed and improve test effectiveness.
I recently read a great whitepaper by Claus Jespersen, called Microsoft Azure AD Conditional Access principles and guidance. I highly recommend you to check out his work! Claus, among many other things, talks about how you can ring manage Conditional Access policies and this got me thinking. My conditional access export/import tools have been included in DCToolbox for some time now and I thought to myself that it should be possible to use them as part of a ring deployment model. The only thing I actually needed to add was a prefix filter parameter so that it would be possible to distinguish different ring policy sets from each other through prefixes. I’ve included this change in version 1.0.22 and this article is a proof on concept of what you can do with it.
I give you ‘Conditional Access Ring Based Deployment with DCToolbox’. Enjoy!
Note: I highly recommend that you also read my previous articles on DCToolbox and Conditional Access automation before trying this.
Our Goal
By creating multiple copies, called rings, of the same Conditional Access policy design, and by using Azure AD groups to deploy them to different sets of users, we can accomplish a ring based deployment model in Conditional Access.
In my example I will use three rings but you could build a solution with as many as you would need.
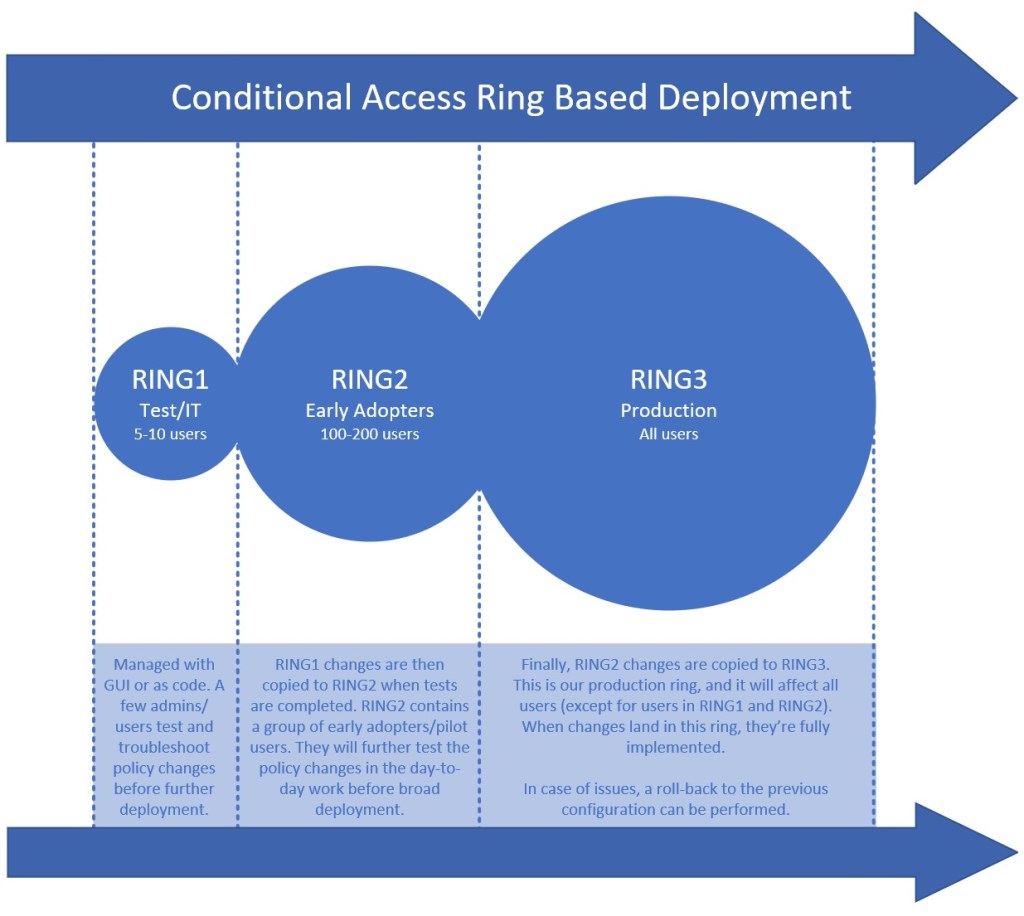
RING1 is for test/IT users who can test, understand and troubleshoot the policy change. RING2 is for a subset of the organisations users, like a pilot group, where 100-200 users receives the updated configuration. RING3 is our production ring and it targets all users (except for RING1 and RING2 users of course).
This is how it might look in the portal when we have multiple sets of the same design. They start with a RINGx prefix. Note that I also have two GLOBAL policies that I’ve not included in any of the rings. These are for guests and service accounts and are rarely changed and not optimal for testing in this ring model. They are ignored by the following scripts and you can ignore them in this article.

Let’s get started!
Make Changes to RING1
The first ring can be managed as code if you want to, or from the Azure Portal. In this example we use the Azure Portal to make changes to our RING1 configuration and then use PowerShell with the DCToolbox module to copy the configuration from RING1 to RING2, and later from RING2 to RING3.
Make sure all your policys in your RING1 have the RING1 prefix in the name. All policies in RING1 includes our CAP RING1 group (see screenshot). This is an Azure AD group you must create and target all your RING1 policies against. Members of this group are the RING1 users. You also need to create a RING2 group with your pilot users.
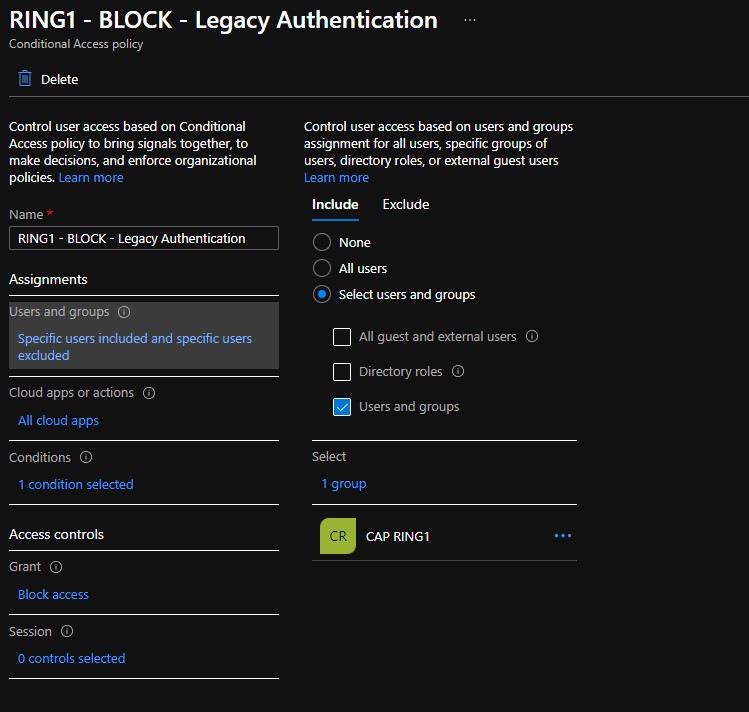
RING1 changes only affects the users in the RING1 group. It should only include a few test/IT users.
Preparations
When we are ready to deploy our RING1 changes to RING2 we use PowerShell. First install at least version 1.0.22 of DCToolbox. This can be done by running:
Install-Module -Name DCToolbox -Force
After that, there are some variables we need. As I already mentioned, all policys in RING1 must start with the prefix RING1, and we need two Azure AD groups for RING1 and RING2. RING3 don’t need a group since that ring will target all users.
Add the Azure AD group object ID’s for RING1 and RING2 groups to the script. We also need to specify a path for the JSON file that will be used in the background.
# Conditional Access deployment ring groups in Azure AD.
$Ring1Group = '5b1fe123-d434-4123-b490-e007c3dd1123'
$Ring2Group = '391232d1-cae2-132c-9646-a8123582a1f8'
$Ring3Group = 'All'

# File path to JSON output.
$Path = 'C:\Temp\Conditional Access.json'
When this is in place, we are ready to start.
Deploy RING1 Configuration to RING2
When we have made policy changes to RING1 and tested them for some time, we are ready to deploy those changes to RING2.
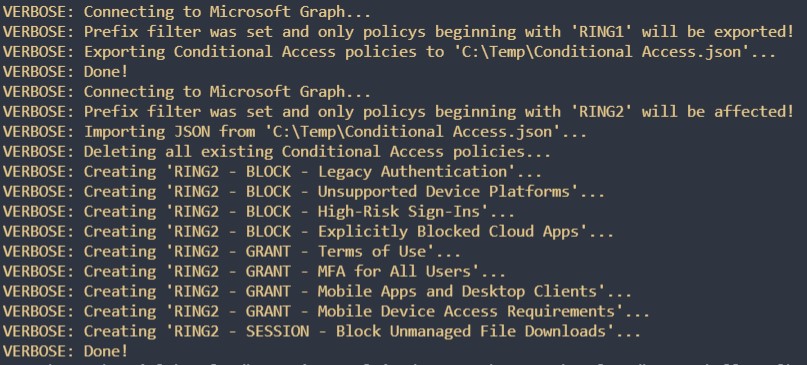
This step is very straightforward. First we export all policys with a prefix of RING1 to our JSON file with Export-DCConditionalAccessPolicyDesign. After that we do a simple search and replace in the JSON file to change RING1 to RING2 and the $Ring1Group to $Ring2Group. The new JSON file is ready and the last step is to deploy it with Import-DCConditionalAccessPolicyDesign.
Notice how the PrefixFilter parameter is used to only affect the correct ring.
# Deploy RING1 configuration to RING2.

# Export RING1 configuration to JSON.
$Parameters = @{
    ClientID = ''
    ClientSecret = ''
    FilePath = $Path
    PrefixFilter = 'RING1'
}

Export-DCConditionalAccessPolicyDesign @Parameters


# Edit JSON: Move RING1 to RING2.
((Get-Content -path $Path -Raw) -replace 'RING1','RING2') | Set-Content -Path $Path
((Get-Content -path $Path -Raw) -replace $Ring1Group, $Ring2Group) | Set-Content -Path $Path


# Deploy the result configuration to RING2.
$Parameters = @{
    ClientID = ''
    ClientSecret = ''
    FilePath = $Path
    SkipReportOnlyMode = $true
    DeleteAllExistingPolicies = $true
    PrefixFilter = 'RING2'
}

Import-DCConditionalAccessPolicyDesign @Parameters
All RING2 policys are deleted and new ones are created from the new JSON file. This is the output.
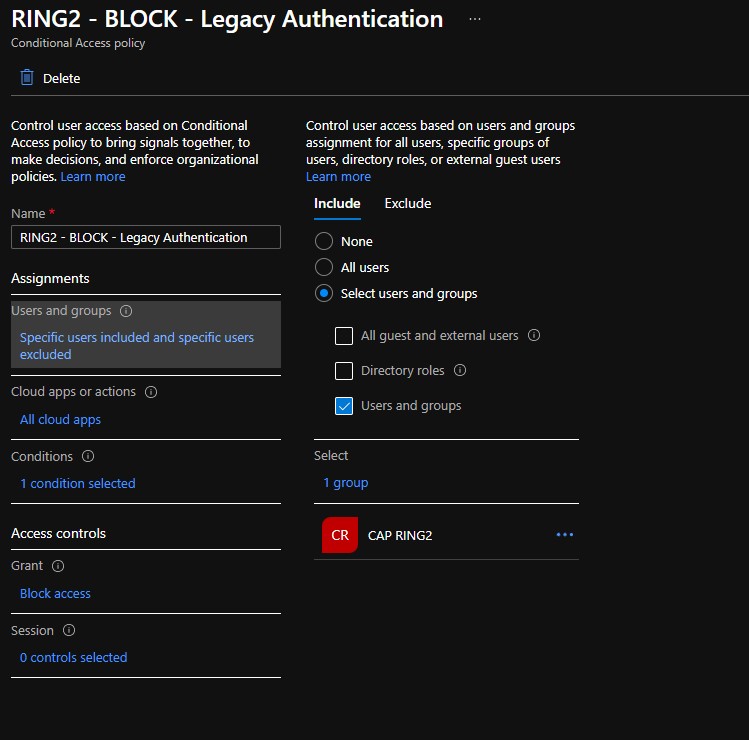
And this is an example of the result of the same policy but in RING2 and with the new group.
Deploy RING2 Configuration to RING3
The RING2 users will test the new configuration for some time and when you are ready it’s time to deploy the same changes to RING3. This step is similar to the last one but RING3 is special as this is our production ring and policys applies to all users (except for users in RING1 and RING2 of course). To accomplish this we convert our JSON to PowerShell objects for easier management of include/exclude groups.
First we export the RING2 configuration to a JSON file, just like last time. After that we search and replace RING2 with RING3. After that we remove $Ring2Group and adds $Ring3Group instead which is set to all users. We also exclude $Ring1Group and $Ring2Group from the RING3 policies so that users in those rings aren’t affected by this production ring.
Finally we convert the configuration back to JSON and deploys it to RING3.
# Deploy RING2 configuration to RING3.

# Export RING2 configuration to JSON.
$Parameters = @{
    ClientID = ''
    ClientSecret = ''
    FilePath = $Path
    PrefixFilter = 'RING2'
}

Export-DCConditionalAccessPolicyDesign @Parameters


# Edit JSON: Move RING2 to RING3.
((Get-Content -path $Path -Raw) -replace 'RING2','RING3') | Set-Content -Path $Path

# Add and remove include/exclude groups for each policy.
$ConditionalAccessPolicies = Get-Content -path $Path -Raw | ConvertFrom-Json

for ($i= 0; $i -lt $ConditionalAccessPolicies.Count; $i++) {
    # Replace $Ring2Group with $Ring3Group.
    if ($ConditionalAccessPolicies[$i].conditions.users.includeGroups.contains($Ring2Group)) {
        $ConditionalAccessPolicies[$i].conditions.users.includeGroups = $ConditionalAccessPolicies[$i].conditions.users.includeGroups -ne $Ring2Group
        $ConditionalAccessPolicies[$i].conditions.users.includeUsers = $ConditionalAccessPolicies[$i].conditions.users.includeUsers += $Ring3Group
    }

    # Add $Ring1Group and $Ring2Group as exclusions to RING3.
    $ConditionalAccessPolicies[$i].conditions.users.excludeGroups = $ConditionalAccessPolicies[$i].conditions.users.excludeGroups += $Ring1Group
    $ConditionalAccessPolicies[$i].conditions.users.excludeGroups = $ConditionalAccessPolicies[$i].conditions.users.excludeGroups += $Ring2Group
}

# Export back to JSON file.
$ConditionalAccessPolicies | ConvertTo-Json -Depth 10 | Set-Content -Path $Path


# Deploy the result configuration to RING3.
$Parameters = @{
    ClientID = ''
    ClientSecret = ''
    FilePath = $Path
    SkipReportOnlyMode = $true
    DeleteAllExistingPolicies = $true
    PrefixFilter = 'RING3'
}

Import-DCConditionalAccessPolicyDesign @Parameters
Again, all existing RING3 policies are deleted and replaced with new ones from our JSON file.

Our changes are now live in our production ring and we have successfully deployed our initial RING1 configuration to RING2, and then RING3. Congratulations, you now have a ring model!

Conclusion
By leveraging the Graph API and automated tools, we can easily make changes to one policy set and replicate it to additional ones. By creating a ring model we can deploy Conditional Access changes in a controlled tempo to our organisations users, while making sure things continue to run.
Also, remember that you can make a complete backup of all your Conditional Access policies at any time by running:
# Export all Conditional Access policies to JSON.
$Parameters = @{
    ClientID = ''
    ClientSecret = ''
    FilePath = $Path

}

Export-DCConditionalAccessPolicyDesign @Parameters
I hope this inspires you!
Please follow me here, on LinkedIn, and on Twitter!

Hello Daniel, i’m trying to get the whole Conditional Access thing and running. I read ur blog arcticles about CA as Code Automation, DCToolbox, etc. As I am new to this and we have no CA Policy running, i want to make it right from the start..
Therefore I want to implement the ring based deployment. But i don#t get it with the Prefix Ring1 as seen in the screenshots.
Where are they come from?
I copied your baseline (Version 11), but there are no Prefix entries. Do they need to be added manually? Thanks in advance!
Hello Daniel, forget my first question. After reading again, and it makes sense, I must edit the baseline JSON on my own.
But now I have the next question. Where have I to add the Azure AD group object ID’s for RING1 and RING2 groups to the script?
It’s easiest to create the first ring manually and then export it to JSON.