
As you might have noticed, I’ve been updating and re-releasing my Conditional Access toolbox for the last couple of weeks. It is now easily accessible through the PowerShell Gallery and the source code is available on GitHub. Feel free to modify the tools to suit your needs.
This blog post summaries and concludes this work and explains my vision of zero trust Conditional Access management by treating your policies as code.

Why manage Conditional Access as Code?
There are many valuable reasons for managing your Conditional Access policies as code. Everything you can put in code can easily be source controlled, version controlled and monitored. It is easy to backup your configuration, to rapidly release changes, and to roll-back in case of issues. You should manage Conditional Access as code because:
- You can adopt a DevOps style of work around your zero trust security model (manage your code in Azure DevOps).
- You can version control your policy design and roll-back to any previous state of configuration.
- You can track who changed what.
- You can deploy the exact same policy in multiple tenants.
- You get policy documentation for free.
- You can easily meet your backup goals.
- You can restore your policy design in case of faulty configuration or sabotage.
- You can rapidly roll-out parallell policy designs for testing and report-only mode scenarios.
- You can share your policy design and knowledge with the Azure AD community.
- Just to name a few!!
Preparations
All the tools I’ve built around Conditional Access policy management is now included in one PowerShell module called DCToolbox.
Install the module from the PowerShell Gallery by running:
Install-Module DCToolbox
If you already installed it, update to the latest version by running:
Update-Module DCToolbox
When you have installed it, to get started, run:
Get-DCHelp

Explore and copy script examples to your clipboard with:
Copy-DCExample
The examples includes instructions, guidance, complete scripts and snippets. There is one called “Manage Conditional Access as code” containing all script examples in this blog post.
Microsoft Graph Permissions
Before running any of the Conditional Access related CMDlets, you first need to register a new application in your Azure AD and grant it the required Microsoft Graph Permissions according to the Register an Application in Azure AD section in this article. Remember to save your application ID (ClientID) and application secret (ClientSecret).
The required DELEGATED Graph Permissions for my Conditional Access tools are:
- Policy.ReadWrite.ConditionalAccess
- Policy.Read.All
- Directory.Read.All
- Agreement.Read.All
- Application.Read.All

Also, the user running the CMDlets (the one who signs in when the authentication pops up) must have the appropriate permissions in Azure AD (Global Admin, Security Admin, Conditional Access Admin, etc).
Export/Backup Your Current Conditional Access Policy Design
A great way of getting started is to simply export your current Conditional Access policies. You can do this by running Export-DCConditionalAccessPolicyDesign. Change ClientID and ClientSecret to match your registered app before running.
# Export your Conditional Access policies to a JSON file for backup.
$Parameters = @{
    ClientID = ''
    ClientSecret = ''
    FilePath = 'C:\Temp\Conditional Access Backup.json'
}

Export-DCConditionalAccessPolicyDesign @Parameters
This will export all your Conditional Access policies to a standardised JSON file. You can easily import the same policy again with Import-DCConditionalAccessPolicyDesign.
Import Conditional Access Policy Design
When you have a JSON file with your desired configuration, you can import it with Import-DCConditionalAccessPolicyDesign.
# Import Conditional Access policies from a JSON file exported by Export-DCConditionalAccessPolicyDesign.
$Parameters = @{
    ClientID = ''
    ClientSecret = ''
    FilePath = 'C:\Temp\Conditional Access Backup.json'
    SkipReportOnlyMode = $false
    DeleteAllExistingPolicies = $false
}

Import-DCConditionalAccessPolicyDesign @Parameters
By default, the policies will be created in report-only mode but if you have already tested your policy design and are certain that it works, you can set SkipReportOnlyMode to $true to make them go live right away.
You can also delete all existing Conditional Access policies by setting DeleteAllExistingPolicices to $true. This is very powerful when you want to go all in and manage your Conditional Access as code. It will basically overwrite your implemented policy design with the new one in the JSON file. PLEASE USE THIS PARAMETER WITH CAUTION!!
Edit Conditional Access as Code
We’ve already mentioned that policies are exported and imported as JSON. Of course, this means that we can edit the JSON code with any text editor to modify policies or to create new ones.
I strongly recommend using Visual Studio Code for JSON editing. PowerShell does not export the prettiest JSON you’ve seen so the first thing I always do is letting Visual Studio Code format the JSON for me to make it more readable.

Each policy in the JSON file will look something like this:
{
    "displayName": "BLOCK - Legacy Authentication",
    "state": "enabled",
    "sessionControls": null,
    "conditions": {
        "userRiskLevels": [],
        "signInRiskLevels": [],
        "clientAppTypes": [
            "exchangeActiveSync",
            "other"
        ],
        "platforms": null,
        "locations": null,
        "deviceStates": null,
        "devices": null,
        "clientApplications": null,
        "applications": {
            "includeApplications": [
                "All"
            ],
            "excludeApplications": [],
            "includeUserActions": []
        },
        "users": {
            "includeUsers": [
                "All"
            ],
            "excludeUsers": [],
            "includeGroups": [],
            "excludeGroups": [
                "c6754fc8-fffe-4065-a98a-f5a9ed3c43d6"
            ],
            "includeRoles": [],
            "excludeRoles": []
        }
}
You can read about the syntax and all possible settings in the Microsoft Graph documentation if your’re interested. I use the beta API since no Conditional Access preview features are available in the v1.0 API (and there are many important preview features we want to use).
I also recommend installing the Visual Studio Code plugin Json Editor. This makes it really easy to make changes to your Conditional Access policy design and to move policies around if you want them in a preferred order in the portal.
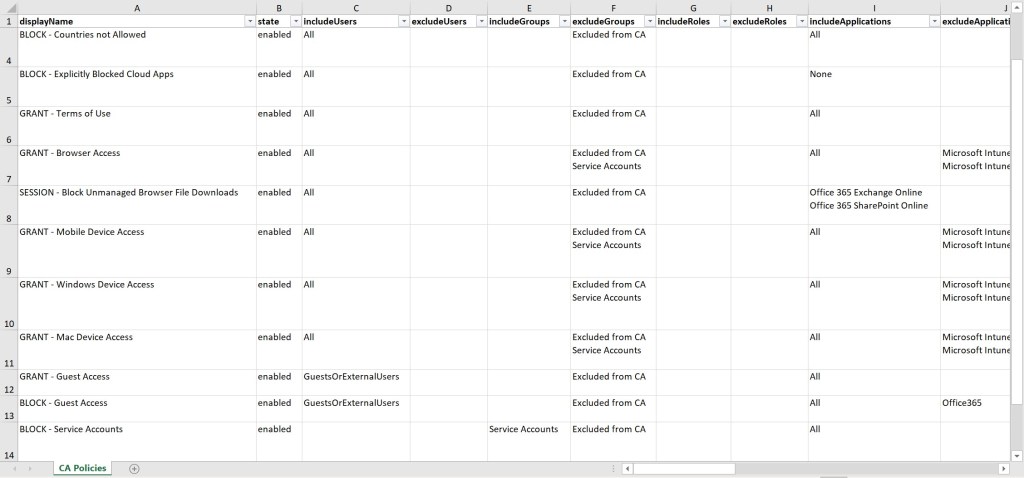
Create an Easy-to-Read Conditional Access Policy Design Report in Excel
Finally, you can use New-DCConditionalAccessPolicyDesignReport to create a nice Excel report of your current Conditional Access policy design. I believe that this is the easiest way to get an overview of a complex Conditional Access implementation and this is something I always do when I come across a new tenant.
# Export Conditional Access policy design report to Excel.
$Parameters = @{
    ClientID = ''
    ClientSecret = ''
}

New-DCConditionalAccessPolicyDesignReport @Parameters
When the script completes, Excel will open the new report. To fine tune its appearance, press CTRL+A to select all cells, wrap the text and make it stay on top (see below). This will produce the same format as in the example.

The report will look something like this:
Conclusion
This is the conclusion of my effort to bring easy Conditional Access code management to the community. Of course, I will continue to improve the tools and release new ones, but this is the very important foundation.
I will also continue to provide my Conditional Access baseline, from now on as a JSON file that can be imported with Import-DCConditionalAccessPolicyDesign.
To learn more about the Conditional Access tools used, run:
Get-Help Export-DCConditionalAccessPolicyDesign -Full
Get-Help Import-DCConditionalAccessPolicyDesign -Full
Get-Help New-DCConditionalAccessPolicyDesignReport -Full
I’ve also posted a video guide for backup and restore on my YouTube channel:
I hope you find all of this useful and inspiring and I hope it will help you on your zero trust journey in the Microsoft cloud!
Please follow me here, on LinkedIn and on Twitter!

Hello,
Have you considered this https://laurakokkarinen.com/authenticating-to-azure-ad-protected-apis-with-managed-identity-no-key-vault-required/
To avoid the credentials parts
Thank you for your question! Yes, but I’m not planning on implementing such a solution right now. Maybe in the future.
I can’t seem to get this working. I keep getting this:
“You cannot perform the requested operation, required scopes are missing in the token.”
If I use your deprecated function Get-GraphApiResult, I get a list of users and so that tells me my GraphiAPI permissions are configured correctly.
Hi Daniel, Love this post. has saved so much of my time. I was wondering if I could set the export to Excel as a scheduled task. I know this opens up excel but it thea way I could get it to save to a file
Please make sure you are using Delegated graph permissions (not Application permissions), and also make sure you did the Admin consent part in Microsoft Graph.
Thank you! It already saves to an Excel file in the current directory, after that it opens Excel. So you could change the script by removing the last part that opens up Excel, but the issue is the credentials, since you would have to disable MFA and such. I would rebuild the script to use applications permissions instead and setup monitoring of failed sign-ins. Hope this points you in the right direction!
Great way to manage the CA policies on a structured way! Back-up and export works without problems, but when I run the import I receive this message: ‘Response status code does not indicate success: 400 (Bad Request)’. Could you please advise me what to do? Thnx!
Hi Daniel, great post and very useful! With the import function I receive this error: Response status code does not indicate success: 400 (Bad Request).
Could you advise me what to do?
Thank you Michiel! I would troubleshoot by running the Graph queries manually, both with PowerShell but also with the Graph Explorer. It’s such a general error message so I’m afraid I can’t be more detailed. Graph Explorer outputs detailed error info.
Hi, First Thanks a lot for this great tool.
I have a problem when i run the export or import command for the conditionnal access.
All is set ( Application, Consent and i check admin consent, admin global for the user who is run the command) but i have an error 403 fordidden, i have a licence too so i am lost, have you already experiment this error ? Thanks
Hi! Thank you! If you try to run the same Graph queries with Microsoft Graph Explorer first you might get additional details about your 403 error.
Here sime information
Export-DCConditionalAccessPolicyDesign @Parameters
COMMENTAIRES : Connecting to Microsoft Graph…
COMMENTAIRES : Exporting Conditional Access policies to ‘C:\caccess\Conditional Access Backup.json’…
Invoke-RestMethod : Le serveur distant a retourné une erreur : (403) Interdit.
Au caractère C:\Program Files\WindowsPowerShell\Modules\DCToolbox\1.0.17\DCToolbox.psm1:895 : 29
+ … ryRequest = Invoke-RestMethod -Headers $HeaderParams -Uri $GraphUri – …
+ ~~~~~~~~~~~~~~~~~~~~~~~~~~~~~~~~~~~~~~~~~~~~~~~~~~~~~~~~~
+ CategoryInfo : InvalidOperation : (System.Net.HttpWebRequest:HttpWebRequest) [Invoke-RestMethod], WebException
+ FullyQualifiedErrorId : WebCmdletWebResponseException,Microsoft.PowerShell.Commands.InvokeRestMethodCommand
How to run the same graph query in microsoft Graph ?
I’m always getting the error: AADSTS50011: The reply url specified in the request does not match the reply urls configured for the application. Any ideas ?
Yes, you need to set the reply URL for your app registration.
Set the redirect URL to Public client/native and https://login.microsoftonline.com/common/oauth2/nativeclient
More info:
Hi Daniel,
I get this error in my tenant: Invoke-RestMethod : Remoteserver Error: (429) Too Many Requests.
In C:….\WindowsPowerShell\Modules\DCToolbox\1.0.18\DCToolbox.psm1:895 Zeichen:29
after executing DCConditionalAccessPolicyDesignReport
How can I fix this?
Thanks
Register an Application in Azure AD – the directions at that link seem to be deprecated, or I’m missing something. Specifically about the Keys part. Where is that found now, as it doesn’t seem to be there under the registration.
The link should still be relevant. Works fine for me. Here it is: https://danielchronlund.com/2018/11/19/fetch-data-from-microsoft-graph-with-powershell-paging-support/
When trying to produce the Excel document with New-DCConditionalAccessPolicyDesignReport I am getting a (404) Not Found. Line 913 Char:29
VERBOSE: Connecting to Microsoft Graph…
VERBOSE: Generating Conditional Access policy design report…
Invoke-RestMethod : The remote server returned an error: (404) Not Found.
At C:\Program Files\WindowsPowerShell\Modules\DCToolbox\1.0.22\DCToolbox.psm1:913 char:29
+ … ryRequest = Invoke-RestMethod -Headers $HeaderParams -Uri $GraphUri – …
+ ~~~~~~~~~~~~~~~~~~~~~~~~~~~~~~~~~~~~~~~~~~~~~~~~~~~~~~~~~
+ CategoryInfo : InvalidOperation: (System.Net.HttpWebRequest:HttpWebRequest) [Invoke-RestMethod], WebException
+ FullyQualifiedErrorId : WebCmdletWebResponseException,Microsoft.PowerShell.Commands.InvokeRestMethodCommand
Hard to say what might be the issue. 404 is a general error message. If you like me to troubleshoot further, please send me a JSON with your policy design, preferably without specific IDs and such.
What I am looking to do is pull a report of the current CAPs and export to an excel file. Is the New-DCConditionalAccessPolicyDesignReport the right command to do this?
Yes, but it downloads the JSON data from Graph and creates the report from that. Your policies must contain a configuration that the tool can’t understand yet. To be able to fix this, I must understand where the error is and then add support for it.
Problem Solved
1. (404) Not Found – There were CAPs that still had User or Group objects still attached that no longer existed.
2. (429) Too Many Requests – I had to add a 2 sec sleep between each query to no hit the Graph limits.
Thank you for contributing this to the community. Great work!
Glad you solved it! Thank you!
Hi too was getting the error 403 forbidden. Turns out I was adding my API permissions as Application permissions. When I switched it to Delegate permissions it started to work for me.
Yes, delegated permissions are required. Instructions here: https://danielchronlund.com/2018/11/19/fetch-data-from-microsoft-graph-with-powershell-paging-support/
What a fantastic tool, have been playing with this for exporting CA from one tenant into another and was wondering; is there an easy way to generate the required Azure user/groups mentioned in the exported policies before running the import into the new tenant?
E.G the exported policies may have the break.glass user account and CA_Excluded group added to the exclusions area of the policies.
Many thanks
Thank you! Yes, you could easily create the required objects with PowerShell and Graph and then insert the resulting object IDs in the JSON. This could be automated with search and replace in the script and then finally launch the import CMDlet.
Hi Daniel, I’ve got DCToolbox working in a test Azure tenant where I have global admin permissions. Our live tenant is much more restricted employing least privilege. Can you please tell me what roles I need to assign for exporting/importing the CA policies? I’ve got it working with Conditional Access Admin, Global Reader, and Application Administrator. Something less than Application Administrator would be good if possible. Many thanks.
I am running the export CAP design report to excel, but I am getting 404 error. Some of the CAP I have is used is from CAP template that is preview. Does the tool support those preview templates?
Hi! Conditional Access admin is the least privileged role for managing Conditoinal Access. See this documentation to find least privileged role by task:
https://docs.microsoft.com/en-us/azure/active-directory/roles/delegate-by-task#security—conditional-access
Sorry I haven’t tried that.
I have similar problems and think it is due to selected admin roles in CA
I have released version 1.0.25 of DCToolbox. Please check if this version solves your problem.
Daniel, Suggest adding Start-Sleep -Seconds 1 in the function New-DCConditionalAccessPolicyDesignReport just above the $GraphUri calls to avoid the 429 API throttling. Edited Documents\PowerShell\Modules\DCToolbox\1.0.28\DCToolbox.psm1 manually and it addresses the throttling
Hello Daniel, great job ! It will definitly simplify CA adoption for many recalcitrant customers.
Maybe I’m missing something but i don’t have found a way to include device state filtering in the reporting function (for example to indicate that devices are filtered based on their “Join” status).
Is this the expected result ?
Thanks for your feedback
Antoine DENTAN